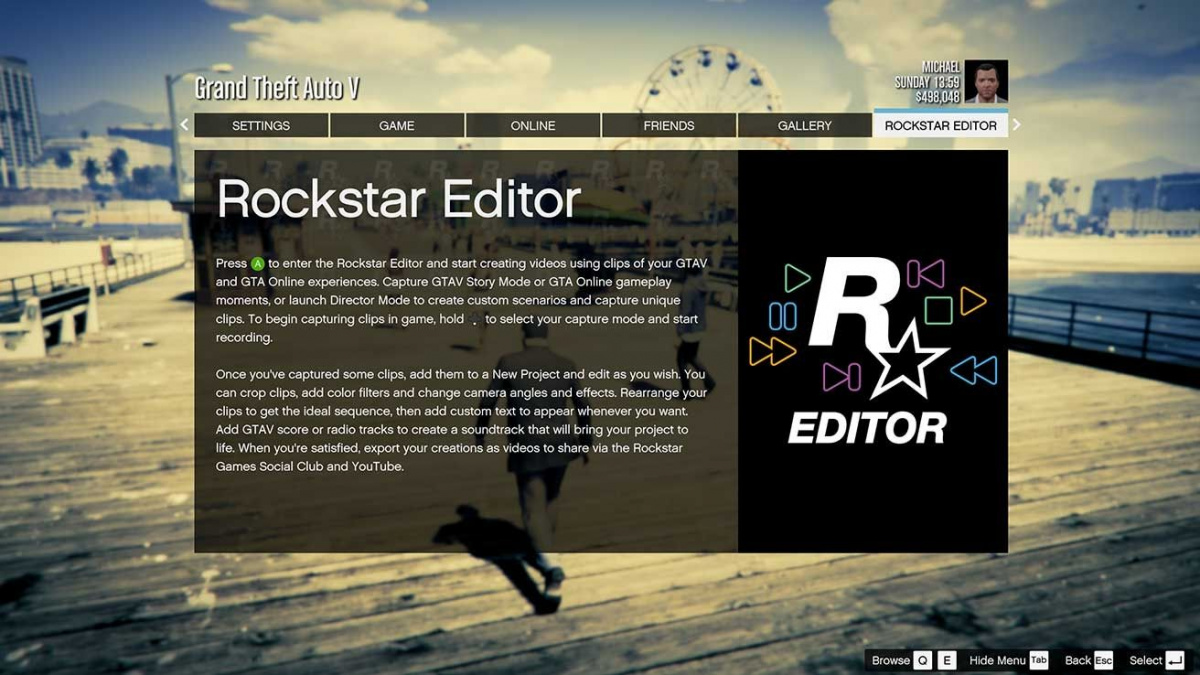
Rockstar Editor is a powerful tool for creating and editing your own videos, trailers, and even movies using the GTA 5 engine. Create, edit, and share gameplay videos of GTA 5 and GTA Online with the Rockstar Editor.
The Rockstar Editor is a set of tools for recording and editing video. Create a whole library of your own recordings using replay modes, import recorded clips into a separate project, use the clip editing mode to change camera angles and make other minor adjustments, and bring your project to life. Share your work on YouTube or Rockstar Games Social Club so your friends can appreciate your creation.
Recording your game
Recording clips
You can record video segments for future clips in two ways: in replay mode or manually, with the editing process not limited to conventional camera angles. You will have the opportunity to shoot from all viewing angles, except for those that have restrictions.
Pay attention to the hint that appears during recording. It will indicate whether there are restrictions for various camera angles for your clip. All clips with restrictions have a special mark that you will see during editing.
Recording modes
To record in replay mode, you need to press the Alt and F2 keys simultaneously, for manual recording – Alt+F1.
How does recording in replay mode work?
This mode is specifically designed for capturing gameplay events that occurred earlier. Its activation is accompanied by regular recording of individual game segments in the background without saving. To save a segment, you need to select the event of interest and press the corresponding key combination Alt+F1 and “Save recording”.
You can start recording at any stage of the game. Initially, it will occur only in the background. The most important moments can be saved in unlimited quantities by pressing Alt (on the left side of the keyboard) and F1 to save or Alt+F3 – to cancel. Subsequently, all segments of the clip will be arranged in the order in which you recorded them.
In case of cancellation (Alt+F3), all unsaved material will be deleted.
Clip information
- To save the finished clip to your computer's hard drive, you need to follow these steps: “Pause Menu” → “Settings” and select “Rockstar Editor”
- Saved clips automatically receive a name in the format of date and number: “month/year Clip XXXX”
- Clips created in replay mode will contain segments of varying lengths: for bright scenes – about 30 seconds, for calm episodes – up to 90 seconds.
- If there is not enough space to store clips, you need to free up space. To do this, in the “Pause Menu” choose « Rockstar Editor», and in it – « Clip Editing», where you can delete all old unnecessary clips.
Main Menu of Rockstar Editor
Menu
The main menu of Rockstar Editor consists of 6 items:
- « Create Project» — Creating a completely new project from previously recorded clips.
- « Load Project» — For working on a previously saved project.
- « Director Mode» — A simple way to activate director mode.
- « Clip Editing» — Managing recorded clips.
- « Video Gallery» — Viewing finished videos uploaded to Rockstar Games Social Club or YouTube.
- « Tutorial» — All the most important information about working in Rockstar Editor.
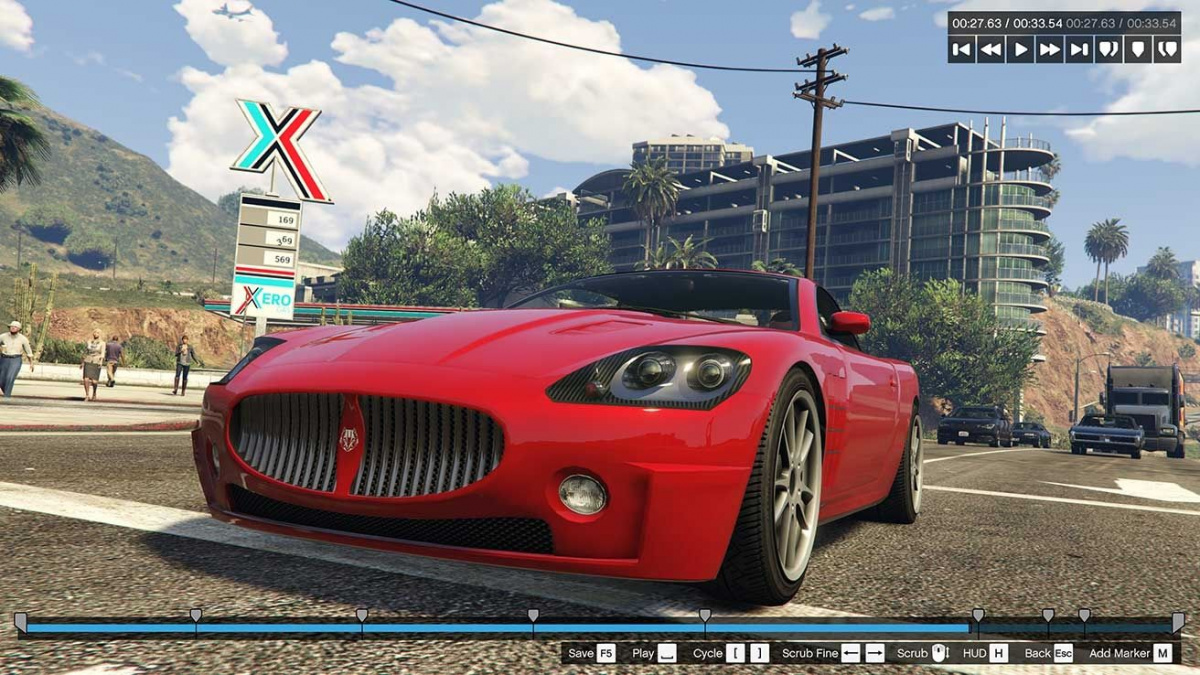
Creating a New Project

To create a new project, you need to select the option « Create New Project», then «add images». Select the desired clips and move them to the timeline. After placing the clip, press the Enter key or double-click each clip for editing. To add clips to the timeline, use the Ctrl+X combination. Deleting a clip from this timeline is done with the Del key. Creating a copy of a video clip is Ctrl+C.
Editing Clips
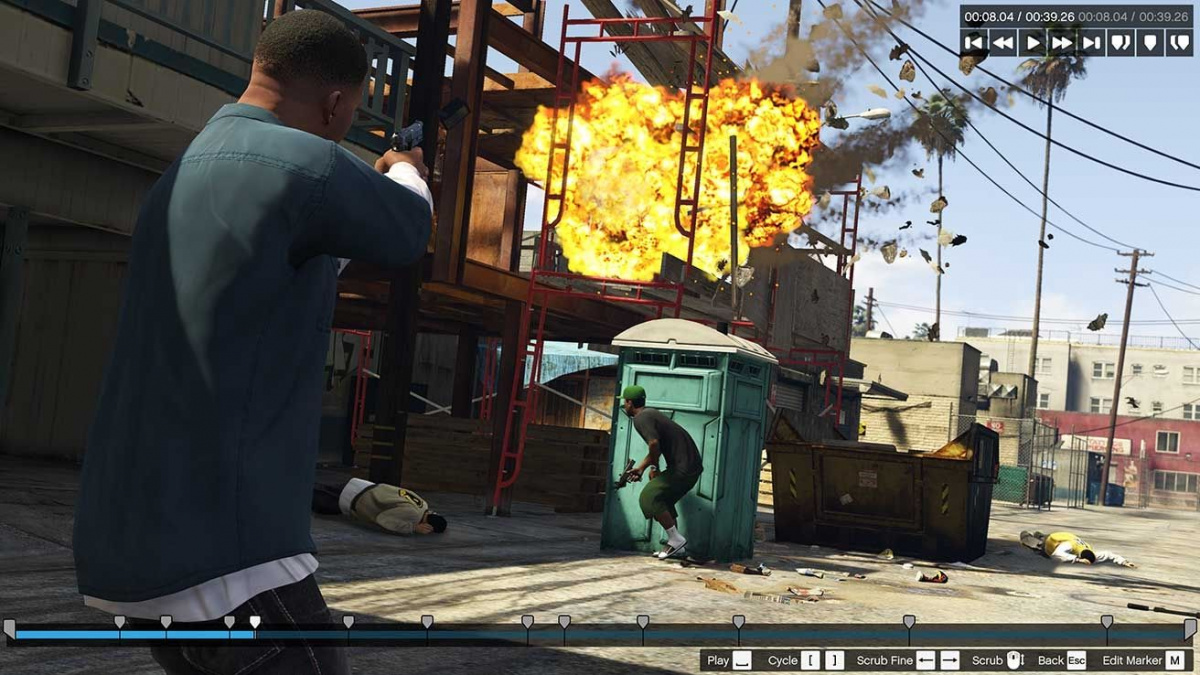
Control Panel
The control panel is located in the upper right part of the screen. Here, the total duration and current time of the clip are indicated. There are also buttons for rewind, jump to the end and beginning, pause, and play.
The control panel will not be displayed if you are using a gamepad.
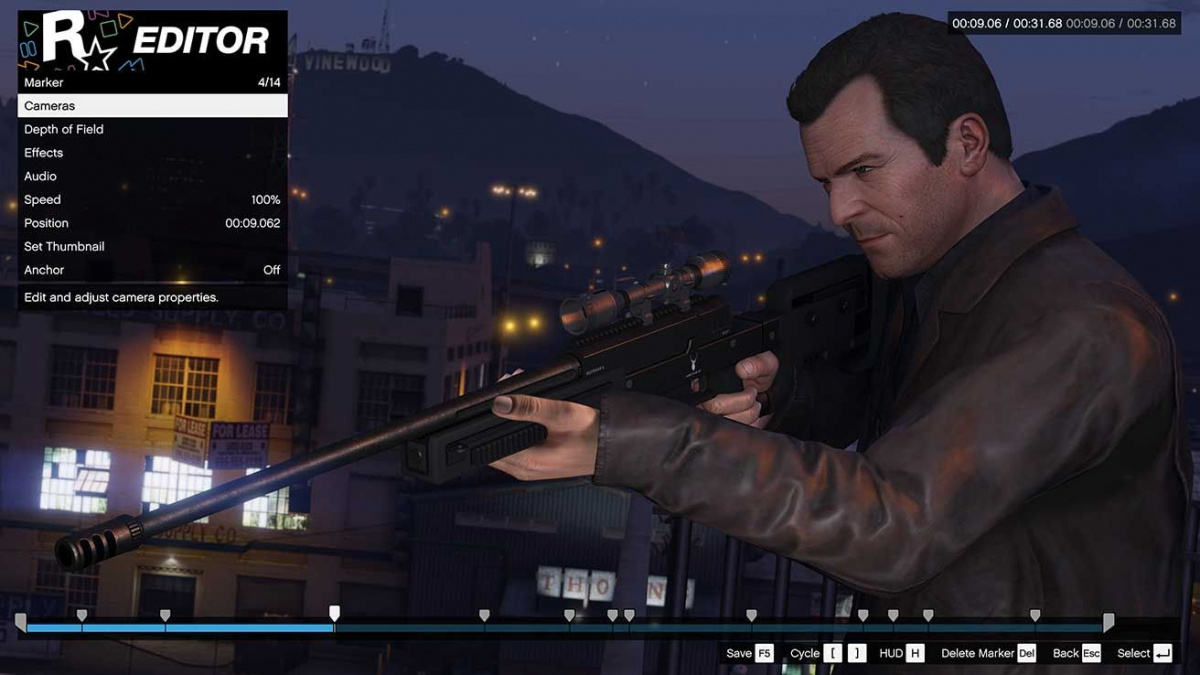
Markers
Markers are intended for setting clip parameters, for example, effects, various shooting angles, playback speed. They can be set at any point in the clip.
Use the mouse wheel or the « Left» and « Right» arrows to scroll through your clip and find the best places to set markers. With the arrows, you can also navigate the markers menu and make the necessary changes.
Setting a marker occurs by pressing the «M» key at the point you want to mark. After that, a window with all available editing options will appear in the upper left part of the screen. In it, you can set video parameters, change depth of field, playback speed, shooting angles, and more. This will allow you to create truly unique and engaging videos.
The duration of the clip can be set manually by selecting the start and end markers and moving the cursor beyond the clip.
Standard Marker Properties
Each new marker carries information about the previous marker on the scale, if it exists. Setting the final marker is the end result; all initial markers will not affect it.
If you want to add a specific visual effect that will be applied throughout your clip, apply it only to the initial marker.
If you want to change the settings of subsequent markers, use the simplified method: after making changes in one marker's menu, press the « Tab» key, which will automatically open the menu of the next marker.
Anchors
An anchor will allow you to place text or sound, and it can be enabled for any marker.
Types of anchors:
- Enabled anchor — The anchor will be displayed on the timeline, and all editing options will be available.
- Disabled anchor — Editing options remain available, but the anchor will not be highlighted on the scale.
- Exclusive — After setting an exclusive anchor, any changes to the marker's settings will be impossible, as this action turns the marker into an anchor. On the timeline, such an anchor is marked in yellow.
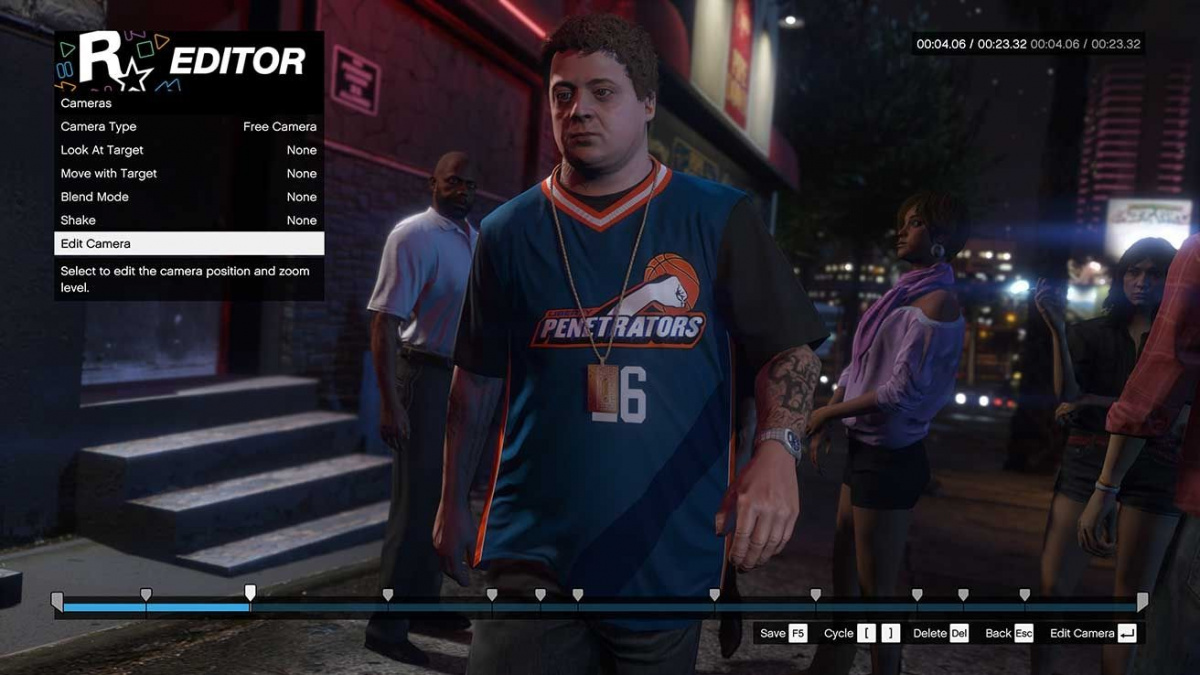
Cameras
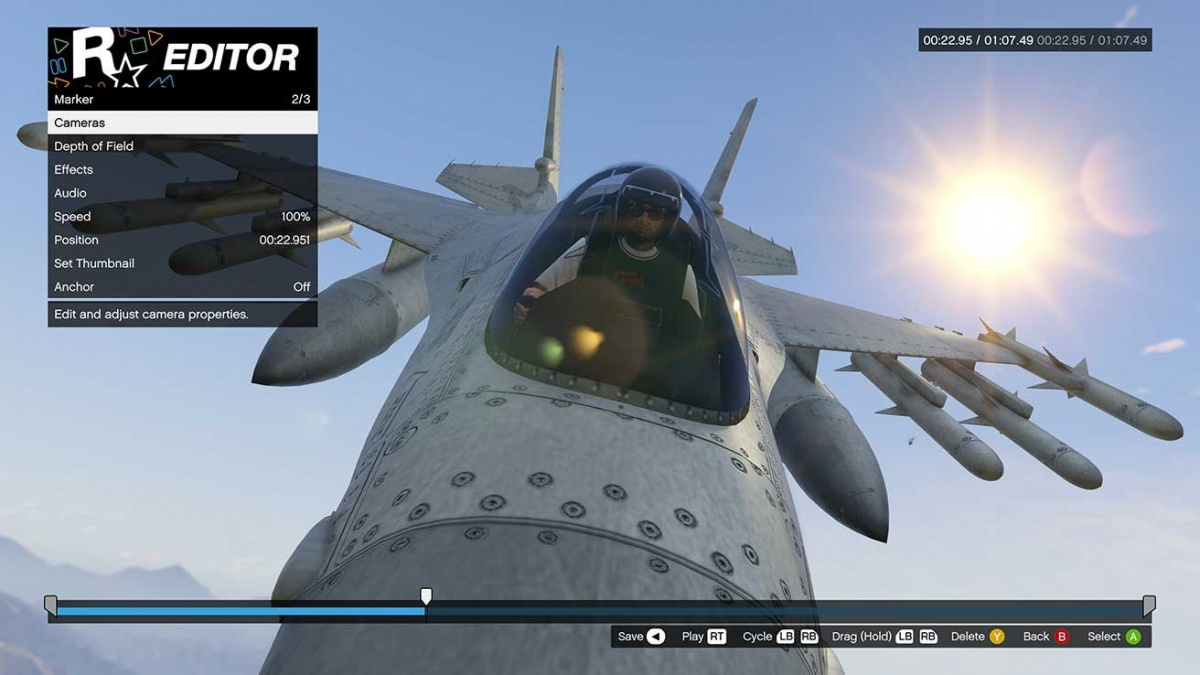
Camera angles in the video can be changed in almost all cases, except when, for example, the recording mode is from the first person. To check if the angle-changing function is available, you need to go to the editing menu.
To change angles, you can use the following types of cameras:
- Game – replicating camera movements during video recording.
- Free – allow you to freely move the camera through available game locations. To focus on the shooting object, select the « Camera Target» option. To ensure smooth movement – « Move with Target». For creating dynamic transitions during angle changes, it is better to use the « Transition Modes» option.
There is also the possibility to use preset angles that allow you to shoot characters closely and from a distance in all projections.
To accurately convey special effects such as explosions, accidents, or powerful hits, use the « Camera Shake» option, which needs to be configured beforehand.
Effects
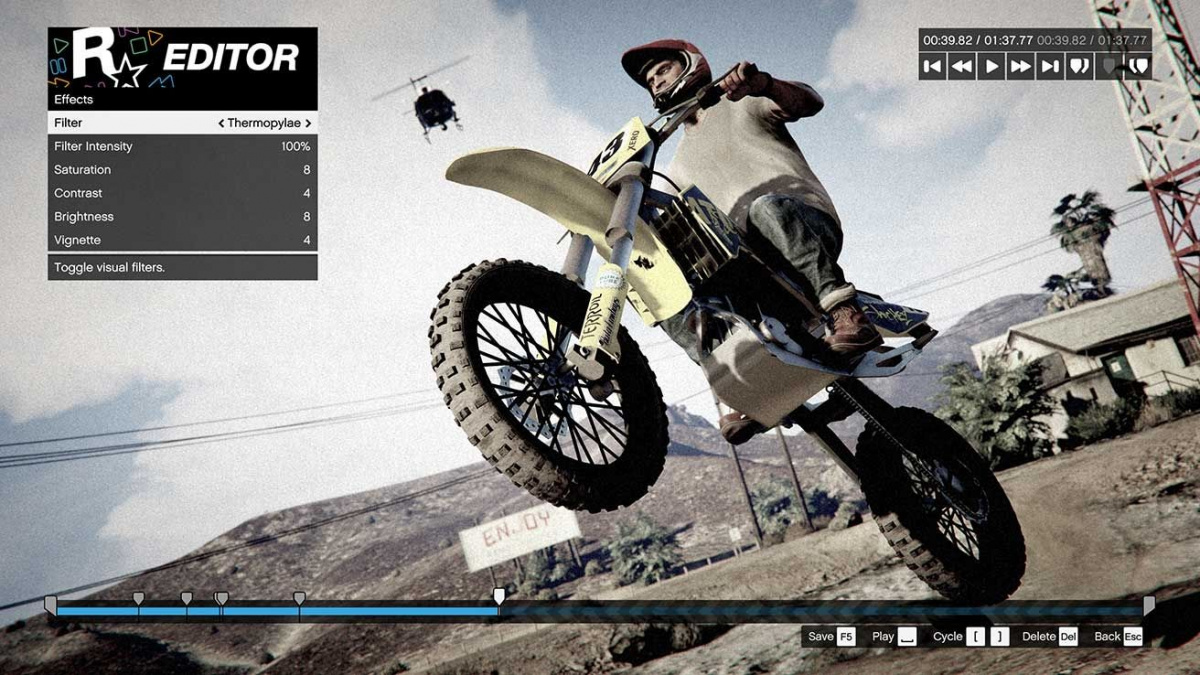
Use various effects, adjusting their intensity yourself. You have access to options for brightness, contrast, saturation, vignetting, and intensity.
Depth of field

Depth of field – a special function that allows you to focus on a specific object or character (focus point). You can adjust the intensity and choose the required type of focus.
You can adjust the depth of field by enabling this option in the «Pause Menu», but DirectX 11 must be running. In the subsection «Special Effects Settings», choose one of the three required levels: «High», «Very High», «Highest Degree».
Sound Settings
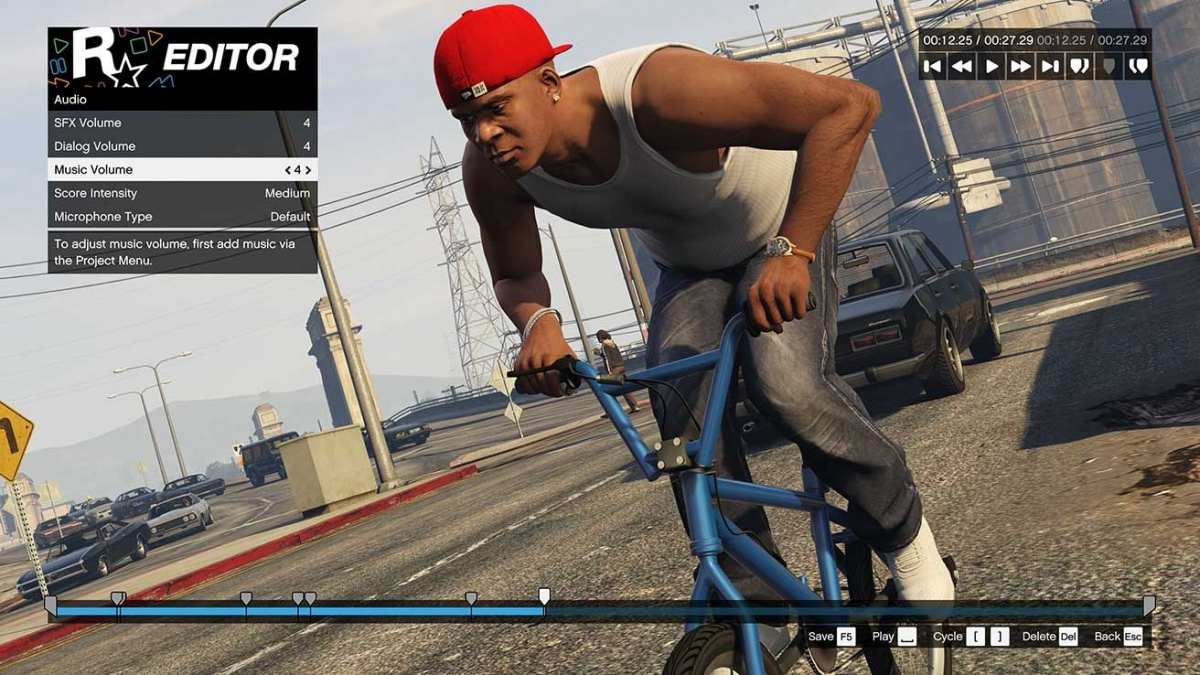
Adjust the volume of the effects you have chosen in the «Sound Settings» menu. Regulating the intensity of the sound will help to powerfully highlight the dramatic effect in the video or conversely reduce the tension.
Speed
Experiment with speed-up and slow-down effects for both the entire video and its individual segments (within the selected markers).
Video Thumbnails
Capture image thumbnails at any point and apply them later on the project's timeline.
Navigation
To change the location of a marker on the timeline, go to the marker menu and select the «Position» option. To save all modified markers, press the F5 key. Pressing Esc will return you to the timeline page, and pressing this key again will quickly take you to the main menu page.
Sound and Text
Add Sound
Once the videos are added and edited, you can add background music. This option is located in the main menu. You have two options for background music:
- GTAV soundtracks with 5 levels of sound intensity.
- Music tracks from the GTAV radio station (songs and jingles from advertisements). The duration of the sound must be at least 30 seconds.
To determine which type is suitable for your video, select the desired melody and drag it to the timeline by moving the cursor while holding down the left mouse button or using the Ctrl+V combination. To synchronize the musical sound, use the «To the next beat» option, where you can also edit the duration of the composition, trimming it to the desired size.
Microphone Type
The sound of your clip can become completely different if you make adjustments in the «Microphone Type» options. Four options are offered: «camera microphone» and «on chain», «default» and «cinematic».
Add Text
In the main menu, select the «Add Text» option, and set the required properties: color, size, font, duration, position, saturation.
Project Preview
Evaluate your project in full-screen mode. You can do this before exporting. For this, there is an option « Preview», located in the main menu.
Saving and Exporting
Saving your project
To change the project name or make several copies of it, you need to use the option « Save project as». For periodic saving, do not forget to use the F5 key. In this case, you can be sure that your work will be saved at all stages.
Exporting your project
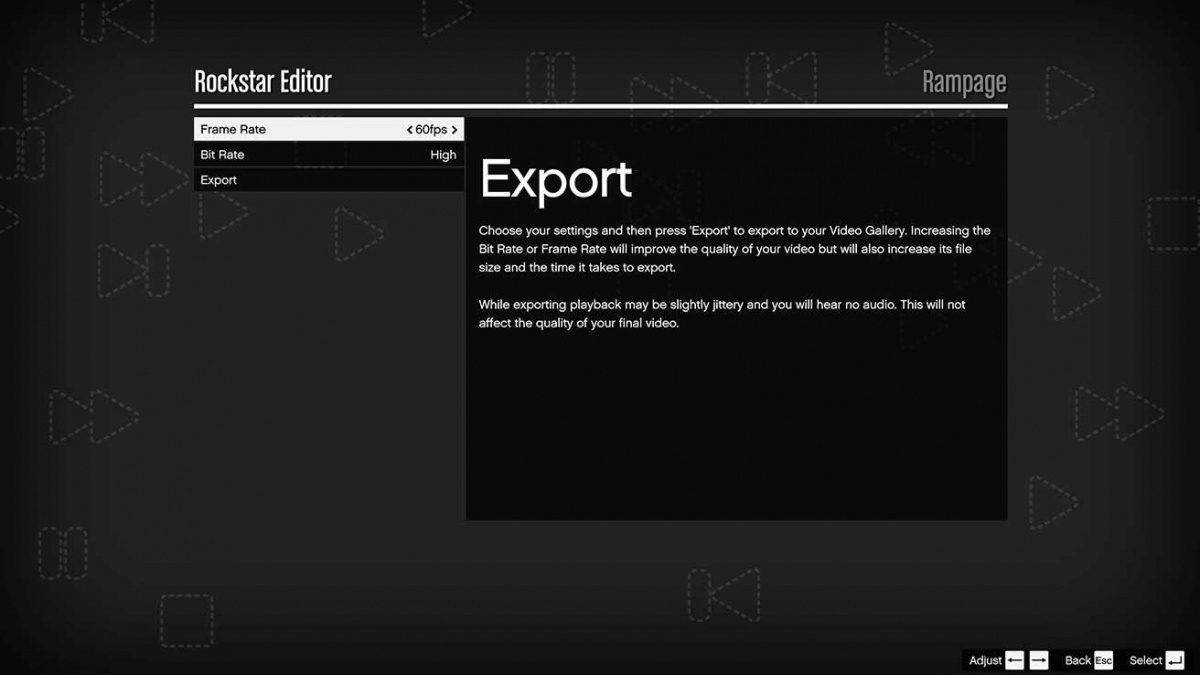
After completing the project, you need to select the « Export» option and specify the parameters for frame rate and bitrate. The export process takes a little longer than the duration of the video itself. As clips appear on the screen, you will be able to observe the process, but the sound will be turned off.
After the export is finished, the clip will be in the editor menu, where you can view it in full-screen mode, and from where it can later be moved to the YouTube page or opened for viewing by friends in Rockstar Games Social Club.
Director Mode
Overview
With the « Director Mode», you can create full-fledged videos. Any story characters from Los Santos and Blaine County, including animals, can become the main characters. In this mode, you will learn to work independently on the scene: change the time of day and weather, add new lines, and modify the script.
Challenge yourself in the role of a director, unleashing your imagination. All actions will be performed in Rockstar Editor, but the possibilities for creating a new exciting product will be significantly greater.
Access
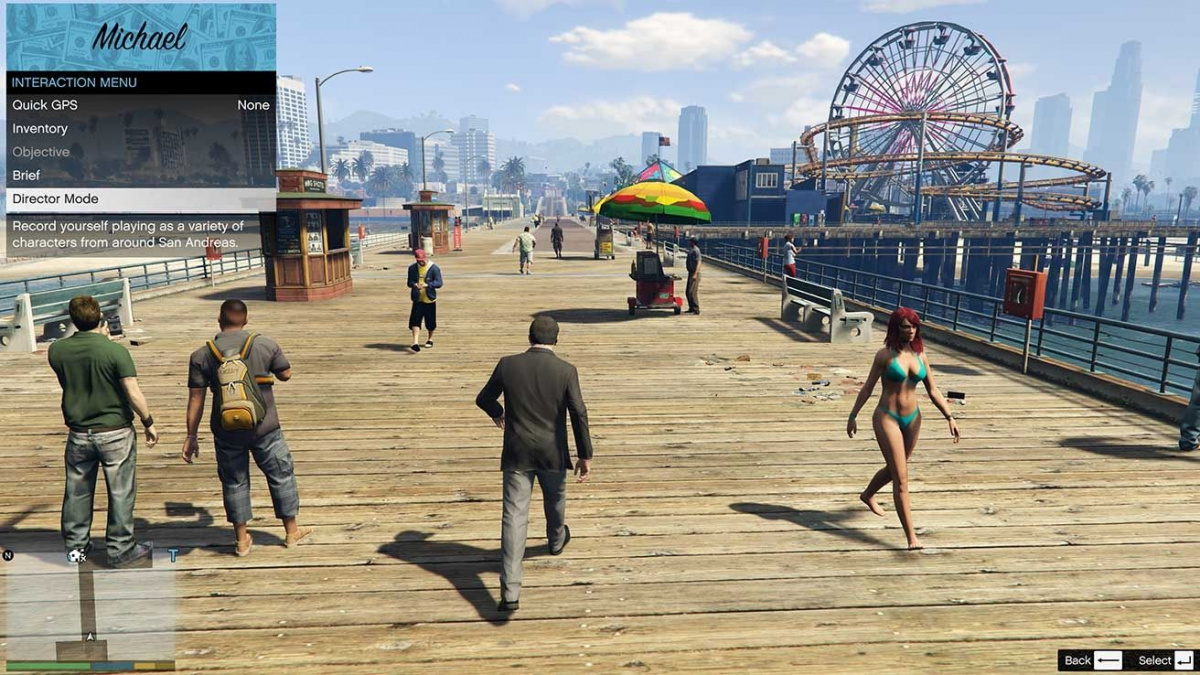
Transition to « Director Mode» is possible only in story mode. Its activation can occur in various ways:
- In the « Interaction» menu. To do this, press and hold the «M» key, which will allow you to open « Director Mode». Please note that to activate it, your wanted level must be inactive, and you must move exclusively on foot.
- In the « Pause» menu. This menu is launched by pressing the « Esc» key. Here, go to Rockstar Editor and select « Director Mode».
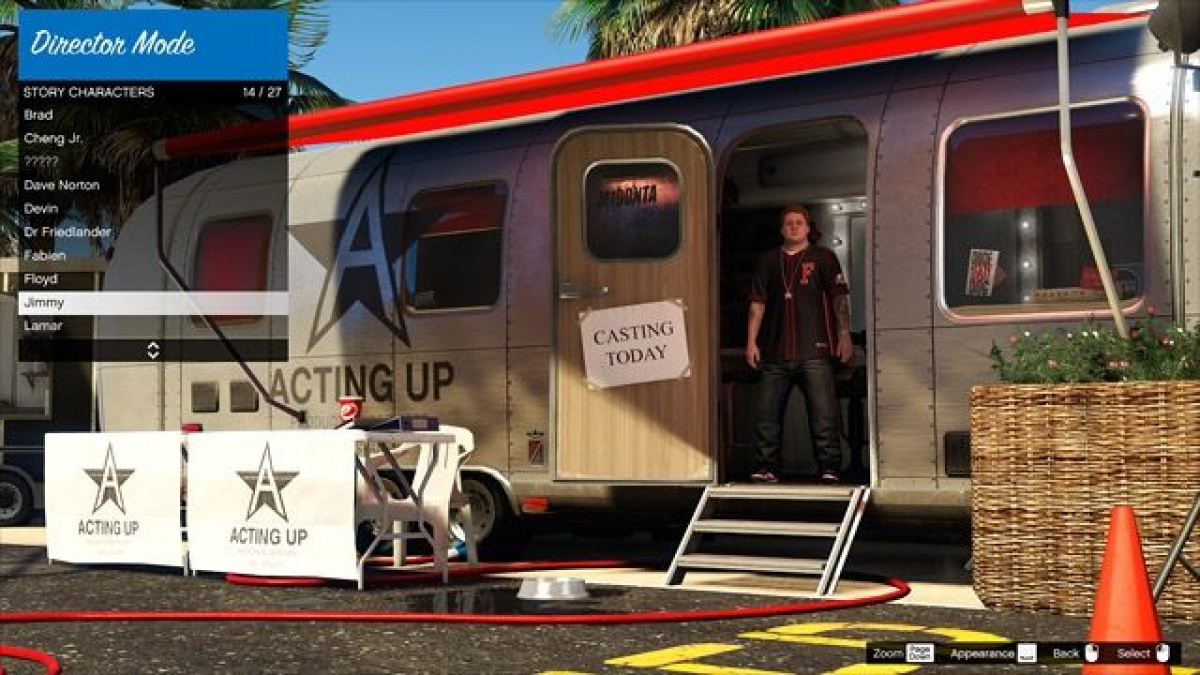
Casting Menu
Choose a character
- To choose who you plan to play as, open the “Character Menu”. As you progress through the game, new characters will become available to you. Pay attention to the abilities of each of them. To replace the player, highlight them with the left mouse button and press Enter. They will be transported to your last stopping point in the game.
Appearance
- This option will allow you to change the color of animals, add hairstyles, mustaches, or beards to characters, and make adjustments to skin and hair color.
Brief list
- Use the function list by pressing the Tab key to add up to 10 characters to the list. They will be available in the director's menu. This way, you can instantly change characters without needing to return to the player selection page. However, they cannot be changed during recording and when they are controlling a vehicle.
Settings menu
To work with various parameters in the «Director Mode», you need to go to the «Settings» menu. Here you can change parameters such as:
- Number of pedestrians on the street. The following options will be available: no pedestrians at all, a small number, medium, and a large number;
- Number of oncoming vehicles. As in the previous parameter, four options are available: no vehicles at all, few, medium, and many;
- Weather. This option is rich in offerings: thunderstorm, rain, cloudiness and cirrus clouds, clear weather, smog, haze, fog, and Christmas mode.
- Time of day. Eight options are available: midnight, twilight, sunset, before dawn, dawn, noon, morning, and afternoon;
- Wanted level. You can completely disable this option or adjust its intensity within: standard level, high, medium, and low.
You can also change parameters such as invincibility, opening/closing restricted areas. All parameters can be changed directly in the director's menu.
Cheat codes
Cheats in «Director Mode» are fully supported. With their help, you can create truly bright, intriguing, and unique videos.
Uploading to YouTube
YouTube upload status
Immediately after finishing work on the video, you can transfer it from the video gallery to the YouTube page.
When moving the video to YouTube with the options «Link access» and «Public access» enabled, it will also be visible in Rockstar Games Social Club. If the «Limited access» option is activated, you can control the visibility of the video, allowing only private individuals to view it.
Video requirements
- The minimum duration of the uploaded video is 1 second;
- The title of the clip must consist solely of permissible words;
- One video can only be uploaded once; even copies with modified titles cannot be published.
User requirements
- Uploading a video to YouTube is only possible if you are logged into Rockstar Games Social Club with your account
- You must have a Google account, which is automatically activated by default for connecting to YouTube;
- The Google account must be linked to an active Rockstar Games Social Club account;
- Each new upload requires acceptance of the information exchange rules between YouTube and Rockstar Games;
- To upload a video with a total duration of more than 15 seconds, you must be a verified YouTube user;
- Both on YouTube and in Social Club, you must not have any claims from the administration for rule violations and your account must be active (not banned).
Video metadata
Uploading videos on the YouTube page is accompanied by setting the following metadata:
- Product name and separately the name of the game
- Duration of the video and size of the uploaded file
- Date of publication
- Platform
- Brief description of the content
- Tag
The last two parameters are not mandatory.
Running, Man — the first video created in Rockstar Editor
The first video created in the Rockstar Editor in GTA 5 for PC was the work of 8-BIT BASTARD — a short film titled Running, Man:
